Arduino App Lab and IoT Remote Phone App Integration
This tutorial teaches you how to leverage the Arduino IoT Remote app to use your phone sensors with Arduino App Lab applications…
In this tutorial, you will learn how to unlock your smartphone’s potential within Arduino App Lab using the IoT Remote app. We will explore a powerful new feature that turns your phone into a wireless input device. Specifically, you will learn how to stream video from your phone directly to the Arduino App Lab to power the Object Detection Brick, allowing you to run AI vision projects without needing a USB webcam.
Note: Your smartphone will be used as a remote camera input. Both the Arduino UNO Q and your smartphone must be connected to the same network.

Goals
- Understand the integration between the IoT Remote app and the Arduino App Lab.
- Configure your smartphone to act as a wireless camera input for your projects.
- Test an example application using the Object Detection Brick with the remote video feed as input.
- Run the project to detect and classify objects in real-time using your phone
How It Works
This integration transforms your smartphone into a wireless camera for the Arduino App Lab through a secure pairing process:
The Pairing Process
- QR Code Generation: When you run your app, the Arduino UNO Q generates a unique one-time password (OTP) and creates a QR code containing connection details (IP address, port, and the secret).
- Secure Handshake: You scan the QR code with your phone’s camera app. The IoT Remote app is opened automatically and receives the secret to authenticate with your board over a secure WebSocket connection.
- Video Streaming: Once authenticated, your phone begins streaming video over HTTP on port
4912by default. The board receives these frames and makes them available to your application.
Architecture Overview
The system uses two communication channels:
- WebSocket (Control Channel): Handles the initial pairing and sends control messages. Each session uses a unique secret for security.
- HTTP (Data Channel): Delivers the actual video stream on port
4912, providing continuous data transmission with minimal latency.
Both devices communicate directly over your local network. No video data is sent to the cloud, making sure of privacy and low latency.
Required Hardware and Software
Hardware Requirements
- Arduino UNO Q (x1)
- Smartphone (iOS or Android)
- Personal computer with internet access (to view the Web UI)
Software Requirements
- Arduino App Lab
- IoT Remote App
- Arduino Account
Mobile Camera Streaming
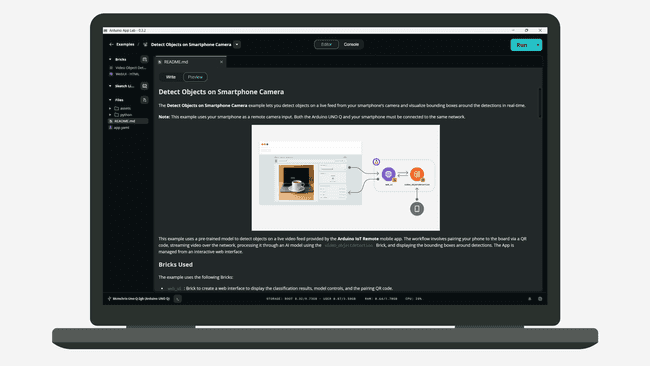
To test this feature, we will leverage the Detect Objects on Smartphone Camera example inside the Arduino App Lab. It will allow us to easily learn how this feature works and try it out without the need to develop an App from scratch.
Arduino App Lab Setup
- Arduino App Lab Setup
- Ensure your Arduino UNO Q is powered and connected to the network.
- Open the Arduino App Lab on your computer.
- Run the Detect Objects on Smartphone Camera example in Arduino App Lab.
- The App should open automatically in the web browser. You can open it manually via
<board-name>.local:7000. - The Web UI will display a QR Code.
follow in next article 2


Add comment